In C++, variables are essential for storing information, and their data types determine the kind of information they can hold as well as the memory they require. Let's explore the basic data types, type modifiers, and how to use them in Dev-C++ with examples.
Primitive Built-in Types
C++ offers a rich set of built-in data types. Here are the basic ones:
- Boolean (bool): Used to store
true or false values.
- Character (char): Used to store
single characters.
- Wide Character
(wchar_t): Used to store wide characters, often for Unicode.
- Integer (int): Used to store
whole numbers.
- Floating Point
(float): Used to store single-precision floating-point numbers.
- Double Floating
Point (double): Used to store double-precision floating-point numbers.
- Void (void): Represents
the absence of type.
These types can be modified using type modifiers such as signed, unsigned, short, and long.
Type Modifiers
Type modifiers expand the range of data types:
- signed: Can store
negative and positive values.
- unsigned: Can only
store positive values.
- short: Uses less
memory.
- long: Uses more
memory.
Memory and Range
Different data types consume different amounts of memory and have
different ranges. Here’s a table summarizing this:
|
Type |
Typical Bit Width |
Typical Range |
|
char |
1 byte |
-128 to 127 or 0 to 255 |
|
unsigned char |
1 byte |
0 to 255 |
|
signed char |
1 byte |
-128 to 127 |
|
int |
4 bytes |
-2147483648 to 2147483647 |
|
unsigned int |
4 bytes |
0 to 4294967295 |
|
short int |
2 bytes |
-32768 to 32767 |
|
unsigned short int |
2 bytes |
0 to 65535 |
|
long int |
8 bytes |
-9223372036854775808 to 9223372036854775807 |
|
unsigned long int |
8 bytes |
0 to 18446744073709551615 |
|
long long int |
8 bytes |
-(2^63) to (2^63)-1 |
|
unsigned long long int |
8 bytes |
0 to 18446744073709551615 |
|
float |
4 bytes |
Varies |
|
double |
8 bytes |
Varies |
|
long double |
12 bytes |
Varies |
|
wchar_t |
2 or 4 bytes |
1 wide character |
Example in Dev-C++
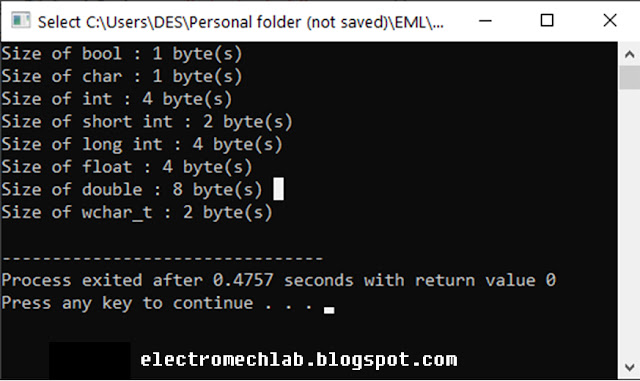
To find out the size of various data types on your system using Dev-C++,
you can use the following program:
#include <iostream>
using namespace std;
int main() {
cout << "Size of bool : " << sizeof(bool) <<
" byte(s)" << endl;
cout << "Size of char : " << sizeof(char) <<
" byte(s)" << endl;
cout << "Size of int : " << sizeof(int) <<
" byte(s)" << endl;
cout << "Size of short int : " << sizeof(short
int) << " byte(s)" << endl;
cout << "Size of long int : " << sizeof(long int)
<< " byte(s)" << endl;
cout << "Size of float : " << sizeof(float)
<< " byte(s)" << endl;
cout << "Size of double : " << sizeof(double)
<< " byte(s)" << endl;
cout << "Size of wchar_t : " << sizeof(wchar_t)
<< " byte(s)" << endl;
return 0;
}
Checking Value Limits
To find the minimum and maximum values of various data types, you can use
the numeric_limits library:
#include <iostream>
#include <limits>
using namespace std;
int main() {
cout << "Int Min: " <<
numeric_limits<int>::min() << endl;
cout << "Int Max: " <<
numeric_limits<int>::max() << endl;
cout << "Unsigned Int Min: " <<
numeric_limits<unsigned int>::min() << endl;
cout << "Unsigned Int Max: " <<
numeric_limits<unsigned int>::max() << endl;
cout << "Long Int Min: " << numeric_limits<long
int>::min() << endl;
cout << "Long Int Max: " << numeric_limits<long
int>::max() << endl;
cout << "Unsigned Long Int Min: " <<
numeric_limits<unsigned long int>::min() << endl;
cout << "Unsigned Long Int Max: " <<
numeric_limits<unsigned long int>::max() << endl;
return 0;
}
Typedef Declarations
You can use typedef to create new names for existing types:
typedef int feet;
feet distance;
Enumerated Types
Enumerations allow you to define a type with a set of named values:
#include <iostream>
using namespace std;
enum Color { red, green, blue };
Color c = blue;
int main() {
cout << "Color value: " << c << endl; // Outputs: 2 (default value for blue)
return 0;
}
In summary, understanding variables and data types in C++ is crucial for
effective programming. Dev-C++ can be used to experiment with these concepts,
providing a practical way to see how different types and their modifiers behave
on your system.

