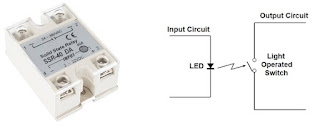
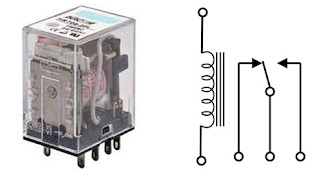
What is Relay?


Relay is an electrically operated switch that opens and closes the circuit by receiving electrical signal from the outside source 

Relay Type:

Ƙ  Relay technology is divided into two categories

1. Movable Contacts

2. No-Movable Contacts


Mechanical Relay


Solid State Relay


Relay Types:

Mechanical Relay

Ƙ  This relay has contacts that are mechanically actuated to open/close by a magnetic force

Ƙ  This magnetic force is produced by a coil which is excited by the electric current

Ƙ  Due to movable part it creates noise during operation


Solid-State Relay

Ƙ  This relay does not have mechanical contacts to control outputs

Ƙ  There are electrical switching elements such as Triac and MOSFET

Ƙ  Since no movable part is there so no noise it creates


Mechanical Relay- Advantages

Ƙ  It provides physical isolation between input and output

Ƙ  It can withstand higher voltages

Ƙ  These relays can tolerate short-term overload condition

Ƙ  Transients do not affect output of the relay significantly


Mechanical Relay- Disadvantages

Ƙ  Due to mechanical contacts its switching speed is slow

Ƙ  It has limited life span due to mechanical parts

Ƙ  These relays create contact-bounces which cause arcing


Solid State Relay - Advantages

Ƙ  It also provides physical isolation between input and output

Ƙ  Switching time is less as compared to the mechanical relay

Ƙ  Life expectancy is higher

Ƙ  These Relays offer greater reliability

Ƙ  No contact-bounce problems


Solid State Relay – Disadvantages

Ƙ  Resistance in the output circuit is normally higher as compared to an Electromechanical relay

Ƙ  It is not resilient to transient spikes and other overload conditions, like a mechanical relay, unless it is protected

Ƙ  A transient above the limits of the output device could destroy the solid state relay


Comments

Popular posts from this blog

How to Make Automatic Room Light Controller Without Microcontroller

You must have noticed in some offices or hotels, when nobody is in gallery or washroom, the light remains OFF but when somebody enters the place, light switches ON automatically. In this post I am going to teach you how to make this circuit. Before going ahead I would like to tell you that this is VERY EASY circuit. For this circuit the material we need is… PIR Motion sensor General Purpose PCB - 5x5 cm. Transistor 2222N – 1 No. Relay 5V – 1 No. 1K/0.250W – 2 Nos. 10K/0.250W – 1 No. IN4007 – 2 Nos. LED 3mm – 1 No. Connector – 4 Nos. Few wires. Relay Circuit Concept : We can use any relay of 12V, 24V, 5V etc. but we have to consider power supply or battery we will use. Since 5V power supply is easily available and 9V battery can also be used for 5V output (after using 7805 regulator if needed). So I am using 5V relay. PIR sensor has three terminals, One for 5Vdc Second for Gnd (0V). Third for

How to drive high voltage/current load by small voltage signal from a microcontroller?

Sometimes we need to control or drive a high voltage and heavy current load by a small voltage signal. For example, if you want to control water motor with your microcontroller output. We know that microcontroller gives only 5v output which is not sufficient to drive a heavy motor. This circuit, about which this post is, is very-very useful for electronics engineer and hobbyist. So pay attention! For this circuit the material we need is… General Purpose PCB - 5x5 cm. Transistor KN 2222A (TO-92) - 1 No. Relay 5V – 1 No. 1K/0.250W – 2 Nos. 10K/0.250W – 1 No. IN4007 – 2 Nos. LED 3mm – 1 No. Connector – 4 Nos. Few wires. Tools. Concept: Weak signal triggers the transistor and transistor acts as a switch for the relay. You can use any relay of 12V, 24V, 5V etc. but we have to consider power supply or battery we will use. Since 5V power supply is easily available and 9V battery can also be used for 5V output (after using 7805 regulator if needed).

Parking Gate with Password Protected Entry | ElectroMech Lab | Arduino

Hello Friends, This project is for password/PIN protected Parking gate. This is very interesting project. I hope you like it. Material: Arduino UNO - 1 No. Servo Motor - 1 No. IR Sensor - 1 No. 4x4 Keypad - 1 No. 9V Battery - 1 No. Toy Car - As per your wish. 10 Kohm Resistor - 1 No. Sketch:  // This code is for password/PIN protected Parking Gate. #include <Keypad.h> #include <Servo.h> Servo myservo;  // create servo object to control a servo int exitSensor= 10;   // pin 10 is connected to out sensor, when vehicle is passed after toll crossing //******************************************************** keypad initialisation  ************************************ char* password = "1245"; // if this is changed then modification is needed in loop section validating the keys const byte ROWS = 4; //four rows const byte COLS = 4; //three columns char keys[ROWS][COLS] = {       {'1', '2', '3', 'A'},   {'4', '5', '6',